

Have you ever wished to create a video with the perfect impact?
Are you looking for an impressive tool or application that can work wonders for your creation?
If you are planning to create a perfect video on macOS then you need not worry anymore. Like creating a video on Windows you can also make a great one using applications that are specifically meant for macOS. You can try using the DaVinci Resolve, but it cannot be considered as the ultimate choice as video editor especially when you have the choice of using the Filmora X for Mac.
What Makes Filmora X Unique
It Works on M1 Chip
A new and enhanced M1Chip, which will be utilized on MacBooks by Apple, may be used with modern FilmoraX software. Filmora X 10.1’s new edition is just starting. The development partners plan to improve and innovate the software in order to be compatible with Apple’s newest 64-bit ARM architecture.
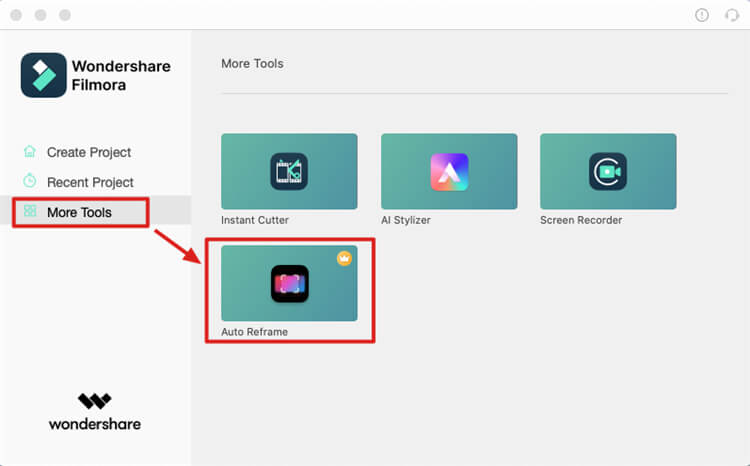
Autoframe
Cutting videos might take time. Do you still spend a lot of time manually cutting films of different aspects to social media posts? Then you are should start using wondershare filmora x
Launch Filmora on your Mac device, choose More Tools > Auto Reframe.

Touch Bar
Depending on what you are doing, your Mac’s touch bar changes and offers controls to make your job more effective. For an intuitive editing experience, Filmora works with its touch bar.


![]()


![]()

Multiple export formats
Unlike iMovie that supports only MP4 format, Filmora supports all popular video formats of current times including MP4, MKV, M4V, AVI, and GIF. regardless of the size of the animated GIF, it is possible to add it to transform it into a creative creation. Exporting GIFs is a slow process as compared to exporting to other formats.
Motion tracking
Perhaps Filmora X is movement Tracking the most exciting new feature. You allow the tracking of the element in the effects panel of an element to monitor the item, move a box around the item, and set the tracker. This tracker can then be linked to all other media in the timeline.
Keyframing
Another animation panel is provided for any video clip in the timeline. The keyframes appear in the timeline as green dots throughout the clip, with buttons that jump into the next keyframe or previous one. In each keyframe, you can change the position, scale, rotation, and opacity of the clip, and Filmora then changes every frame between them to produce a smooth animation.
Color Correction
Color matching is a good new tool in Filmora X. You can pick a clip in your schedule and choose another clip to pair it with using a split-screen comparison view. The first clip has a similar color to the second clip. Although the results can need a bit of refining, this works very well and is a fast way to see many clips.
Audio Tools
Audio ducking, which reduces the volume of other clips associated with the clip chosen, is new in Filmora X. If you have a music track in your project with just a few videos that have speech, you can submit to these clips to duck and your music will decrease so that the voice can be heard. It is a simple and efficient tool that combines musical montage with speech with a camera useful for video applications. Again, however, there will be more manual modification choices.
Huge library
Filmora X has an extensive library that includes audio tracks, transitions, titles, and subtitle effects. After paying a monthly fee you can easily access the downloadable content that includes a wide variety of music and other effects.
If you are a newbie in the world of Filmora X and video editing then you will find the tutorials too that will let you use Filmora with perfection and ease.
Complex but effective
At first, Filmora seems a hard nut to crack but once you dive into its world of features and creativity it will be evident that it is much easier than many similar applications.
Filmora X permits you to choose any background color without much difficulty. This feature further permits making the videos more impressive.
Screen Recording
You can comfortably create tutorial videos and then record the screen directly. The audio and the system sounds can be recorded with Filmora X while screen recording. All you need is a special driver and then the system sounds can be easily recorded.
System Requirements
Operating System: macOS v11 (Big Sur), macOS v10.15 (Catalina), macOS v10.14 (Mojave), macOS v10.13 (High Sierra), macOS v10.12 (Sierra).
Processor: Intel i5 or better multicore processor, 2 GHz or above (Intel 6th Gen or newer CPU recommended for HD and 4K Videos, also compatible with Apple M1 chip).
Memory: 8 GB RAM (16 GB required for HD and 4K videos).
Graphics: Intel HD Graphics 5000 or later; NVIDIA GeForce GTX 700 or later; AMD Radeon R5 or later. 2 GB vRAM (4 GB required for HD and 4K videos).
Disk: At least 10 GB free hard-disk space for installation (SSD-Solid State Disk recommended for editing HD and 4K videos).
Pros & Cons:
| Easy to Use | Free Version Comes with a Watermark |
| Offers a Free Version | |
| Lightweight Platform | |
| Drag-and-Drop Effects | |
| Hundreds of Transitions | |
| Advanced Audio Editing Capabilities | |
| Affordable Lifetime License |
How To Make A Video With Filmora X
Once you know the features of Filmora X it is time to make use of them by creating a video editing mac. The process isn’t very complex. Here are the steps that you need to follow to install and then create the video.
Installing Filmora X on Mac
Installing the application is not much of a problem. All it requires is dragging and dropping the icon in the Applications folder. After completing the installation go to the Applications folder in Finder and double click.


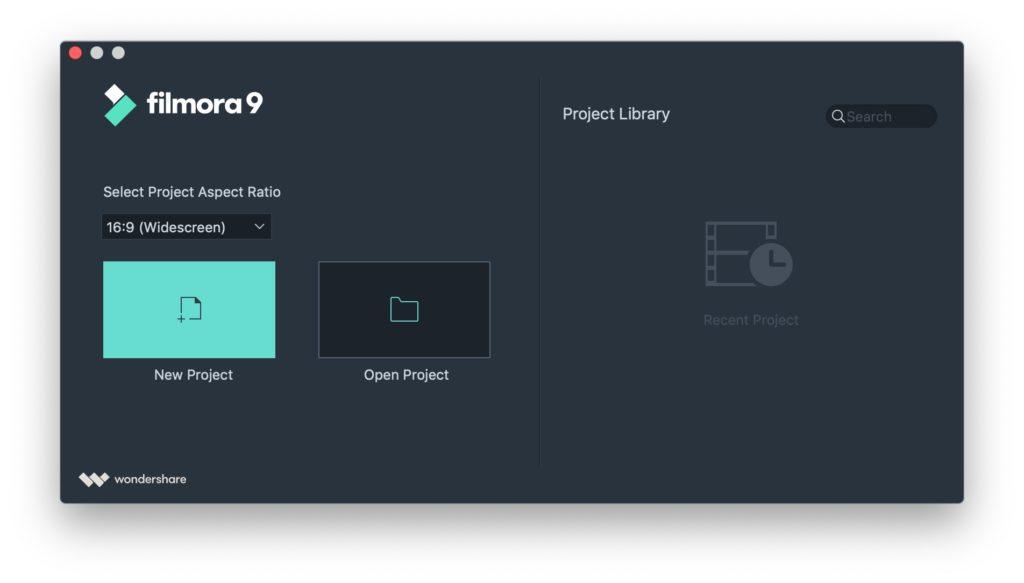
As the application starts the opening screen appears. Depending on the speed of your system it may take some time. It is a heavy program so mostly it takes between 15 to 20 seconds.
On the right-hand side of the screen, you will find the previous creations. Choose the aspect ratio from the drop-down box. You can use the standard TV format of 16 by X. There is also an option of 1 to 1 as well. This is the portrait mode that can help you edit the mobile phone footage. The other options are 4 by 3 and 21 by X.
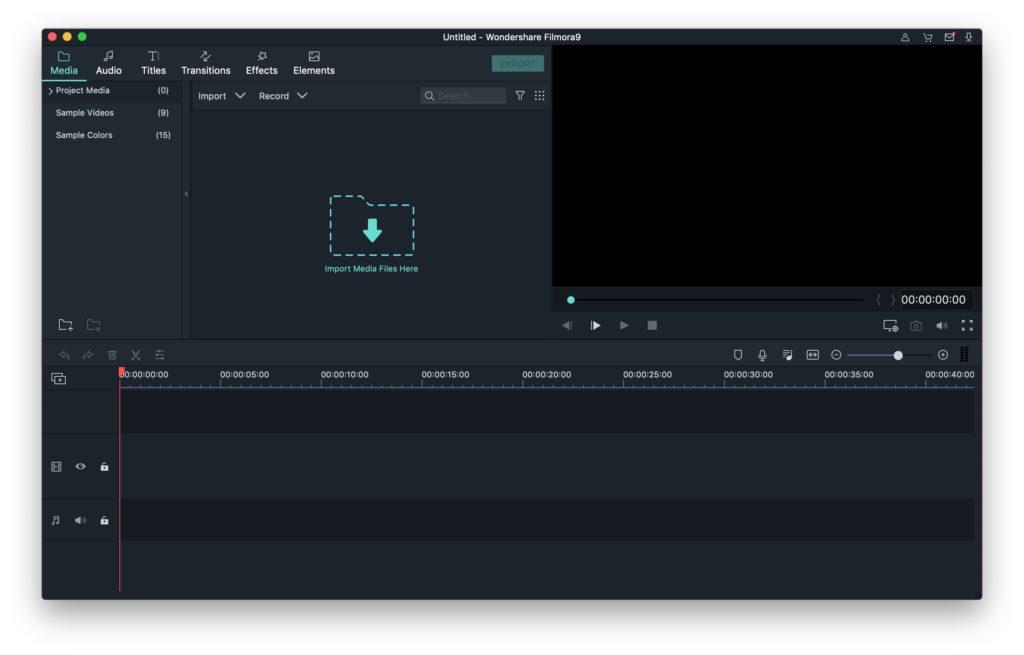
Main Filmora Project Screen
After deciding the size of the project you will find the project screen. This is the screen that you will need to complete the editing. Initially, it has nothing on it but you need to import the files to it. To import the files drag and drop these from the Finder to the dotted folder area. You can also follow the path Main Menu > File > Import Media.
You can either import a single file or an incomplete folder. The latter option is helpful if you have several videos that you plan to edit like one.

Camera or phone can be another source of videos and you can import the video from here too.
As You drag the video to the desired track a dialog box will quickly pop up before you. Thus, the video can be recorded in 50 or 60fps. You can also choose an appropriate frame rate of 25 or 30fps for your project. You can further modify the same too.

The track timeline option helps you check for the imported audio and videos from the past. If you do not want the audio, you can simply mute the video. Right-click on the audio track option. You can now choose to separate the audio from the video or you can simply mute it.
If you are looking for a different audio track for the video then you can drag the required file from the audio tab. Make sure to align the audios properly, check the waveform, and then add it. You may choose to Zoom in to closely see how the audio tracks have to be positioned.
Adding and Deleting Scenes
Adding additional footage is a simple procedure. You can combine multiple video clips into a complete scene. Once again it is dragging them and combining them.
Drag the multiple clips into the effects tab. You will find a list of multiple transition effects that you can choose between different scenes. The effects can be fading, dissolving, rotating, or wave effects. You can add a transition between different scenes to make them stand apart.
Like adding it is also possible to delete the unwanted tracks from the videos. Move the play head to the location where you want to do the editing. Right-click on the option Split. It will split the scene into two halves. Go to the other location and click to split again. The piece of the video in the middle is the track you want to remove.

Saving the video
If you feel that you are done with the editing then you may use the live preview option that is available on the right side of the main project screen. You are ready to export your works into the actual video file.
If you are not happy with the preview mode then there is nothing to worry about. It can be because of hardware problems. The ultimate product is nice and smooth.
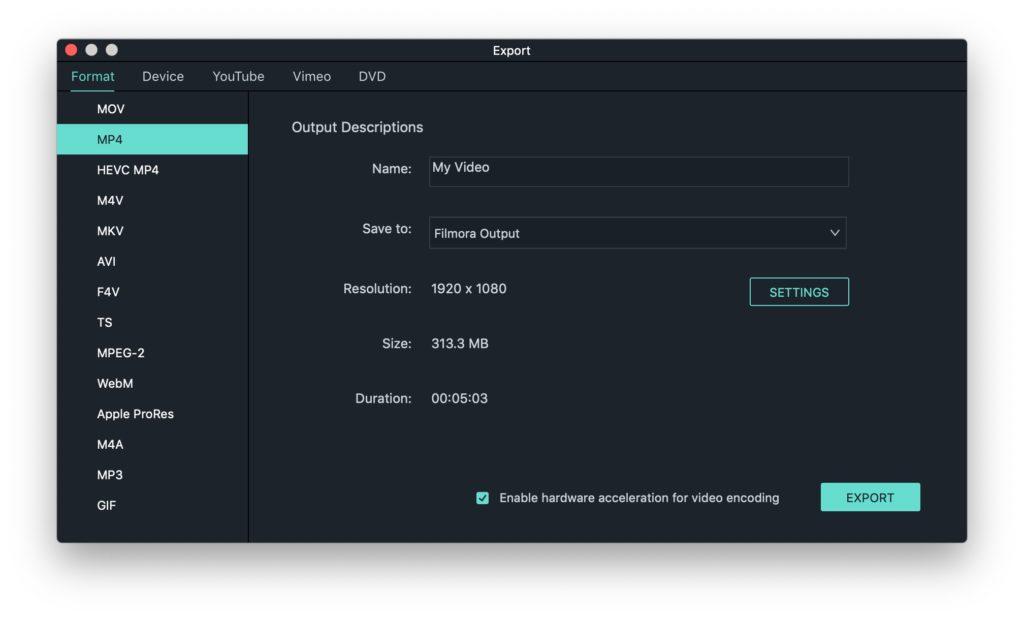
At the top, you will find the Export button. As you click this you will find a dialog box popping up before your eyes.
If you have not paid then it is time to complete it now. You can choose the Free option but usually, the video is limited to three minutes. There will be a Filmora watermark there on the creation. If you have paid for the subscription you can choose the option of using a blank screen.
Supported Formats
Video formats
- MPEG-1/2 Video file: (.mpg, .mpeg, .m1v, .m2v)
- MPEG-4 Video file: (.mp4, .m4v, .3gp, .3g2, .3gp2)
- QuickTime Movie File: (.mov encoded with H.264, MPEG 4 or MJPEG codec only)
- Camcorder File: (.dv, .mod, .tod, .mts, .m2ts, .m2t)
- Flash Video: (.flv, .f4v)
- Audio Visual Interleave: (.avi – Windows format)
- Matroska Video File: (.mkv encoded with H.264, MPEG 4 or MJPEG codec only)
- HTML5 Video File: (.mp4, .webm,. ogv)
- Non-encrypted DVD Titles: (.vob, .vro)
Audio formats
.mp3, .m4a, .wav, .wma, .ogg, .flac, .aac, .aif, .aiff, .caf, .au
Photo formats
.jpg, .png, .bmp, .gif, .tif, .tiff
Output formats
Common video/audio: .mov, .mp4, .m4v, .mkv, .avi, .f4v, .ts, .mpg, .3gp, ProRes, .m4a, .mp3, .gif
4K Video Formats: .mov, .mp4, .m4v, .mkv
Points To Ponder About Exporting
If you are using Filmora on any small device like a laptop or a mobile phone, it is likely to get hot. It is recommended to use the desktop machine for completing the projects. The desktop machines help in creating better outcomes by the virtue of the dedicated graphics card.
Install the Mac Fans control to control the temperature.
Final Verdict
Filmora X for Mac is undoubtedly a great tool to create, edit and upload videos. It is not as cheap as iMovie but still, the features are far more effective.
Filmora X is easy to use and fully packed with awesome features. Thus, as you get the application you can’t stop yourself from praising the quality. It is worth paying for such a feature-packed application.
Frequently Asked Questions About Filmora X
Can I use the free version?
Yes, it is available but with limited options. The output includes a huge Filmora logo and text visible across the creation. In the trial version, it takes 5 minutes to export the video.
Is it possible to use Filmora on Windows too?
Yes, it is available for both the popular OS that is Windows and Mac. there is no difference in the interface for both. Thus, you can comfortably switch between environments as per your personal choices.
Is it possible to view the Windows projects on Mac too
Yes, if you are using Filmora X it is possible but if you are working with the older versions it will not be of any help.
Follow Techdee for more!